
Home » Documentation » Tutorials and Guides » Building a Low-Cost DAS to NAS
Building a Low-Cost DAS to NAS
This article provides step-by-step instructions on building a low-cost DAS-to-NAS (Direct Attached Storage to Network Attached Storage) server using a commonly available thin client computer.
Typical Usage of DAS-to-NAS in a LAN
- Overview
-
A few years back Linksys had a product out called NSLU2 (Network Storage Link for USB 2.0 Disk Drives). It was a NAS device introduced in 2004 and discontinued in 2008 that shared USB Flash memory and hard disks accessible over a network using the SMB/CIFS Protocol. It was a small and convenient device with low power requirements that made Direct Attached Storage (DAS) available to network computers on a LAN.
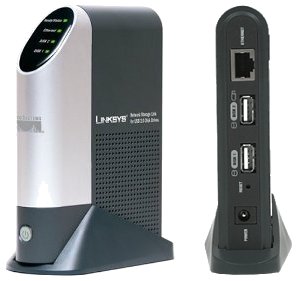
NSLU2 From Linksys
This article will show you a step-by-step process of how to do the same and more with a commonly available thin client computer. The result will not only match the capabilities of the NSLU2 but also provide you with the ability to add FireWire or eSATA support for only a fraction of what you may expect to pay for a commercial solution.
- The Idea of a DAS-to-NAS is Born
-
The Server Elements Support Forums is a great place where people discuss their projects. An interesting post about using a Neoware EON thin client as a NASLite-M2 server was intriguing enough to generate some ideas.
I´ve used thin clients as NASLite servers in the past (see NASLite in a Nutshell available at the Archive page) , but this would be a totally different angle on the old idea of installing a hard drive into a thin client. This would be better. It would be a conversion project that would provide you with a dedicated DAS-to-NAS server making USB, FireWire or eSATA external drives available on your network as network storage volumes and accessible via HTTP, FTP, SMB/CIFS, AFP, NFS, Rsync and optionally DAAP and UPnP.
I set out to find a thin client for the project and as suggested on the Server Elements Support Forum, I headed to eBay. A week and a half later I had a Neoware EON in my hands. First thing I did after I got it out of the box is to plug it in and make sure it´s alive. It most certainly was, so my DAS-to-NAS project is now close to reality.
- DAS-to-NAS Project Components
-
The basic components necessary for our DAS-to-NAS are as follows:
- An x86-based thin client. I´ll be using a Neoware EON, but there are many others out there that would do just fine.
- NASLite-2 or NASLite-M2 depending on what your needs are. I´ll be using NASLite-2 but If you want DAAP and UPnP support, then you´ll need NASLite-M2.
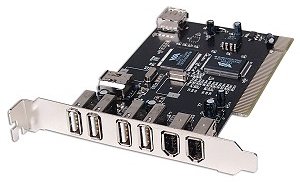
- Optionally a PCI to (USB, FireWire or eSATA) interface card depending on your needs and what your thin client supports.
The Neoware Client I´ll be using has 2 built-in USB ports, however both are USB 1.1 so the data rate is low at 12 Mbit/s. For my purposes, I´d prefer USB 2.0 for improved data rate of 480 Mbit/s. For that I´ll be using a PCI to USB 2.0 interface card commonly available, inexpensive and also present in triplicate from my pile of spares.
- Step 1 - The Teardown
-
I´ll begin by getting into my Neoware EON to assess what I have to work with. After removing the screws and sliding the cover off, I was pleasantly surprised by a nice, clean interior.
I see a DOM (Disk-on-Module) plugged into the single IDE connector. At 128M, the DOM would serve very well as the boot device and would hold the NASLite-2 OS with room to spare.
I also see a 128M SO DIMM (Small Outline DIMM). Although 128M of RAM would work fine for smaller drives, if you are looking to attach 250G or larger drives to your network, more RAM will be necessary. We´ll have to address that later in the project.
The rest is pretty much conventional and needs no special attention.
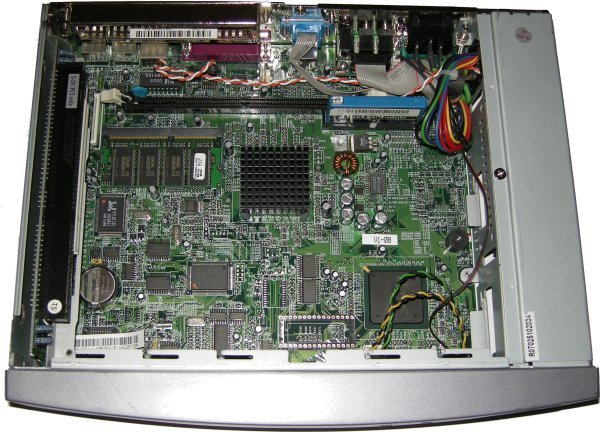
Neoware EON Stock Interior
As a side-note, this particular device has no moving parts, has a built-in power supply and takes only 5W of power when idle. At 300MHz we won´t see exceptional performance but not bad if you are interested in a low power solution. At any rate, it will surely outperform the NSLU2 on many levels.
- Step 2 - Installing NASLite-2
-
Before we go any further, we should install our OS and make sure it likes the Hardware that will become its new home. Since the EON has only a single IDE port that is occupied by the 128M DOM, installation would have to be performed on another computer that can boot the NASLite-2 installation CD-ROM with the DOM connected.
Like most of you out there, I have a spare computer that can be used to install NASLite-2 onto the DOM. Before I do anything I boot the spare PC to make sure all is well. Things look good so the NASLite-2 installation CD-ROM goes into the CD Drive then I reboot to make sure the CD-ROM boots fine. Once again, everything looks good so I power off.
Next I unplug the DOM from the EON IDE port and plug it into the extra IDE port on the spare computer. With the installation CD-ROM in the CD Drive, I hit the power button. Again, all looks good except I have a problem. Drats!!! The DOM is not available and I´m not sure why.
After some basic troubleshooting and tapping Google´s infinite wisdom, the problem turned out to be power related. While the EON powers the DOM via the IDE port, my spare PC didn´t so I need to correct that by providing power to the DOM. The IDE port provides sufficient ground so I need +5v from somewhere and the floppy disk power connector is as good a source as any. My very temporary power hookup is shown in the photo below. Pay very close attention to the connections because it is easy to damage the DOM due to a short.
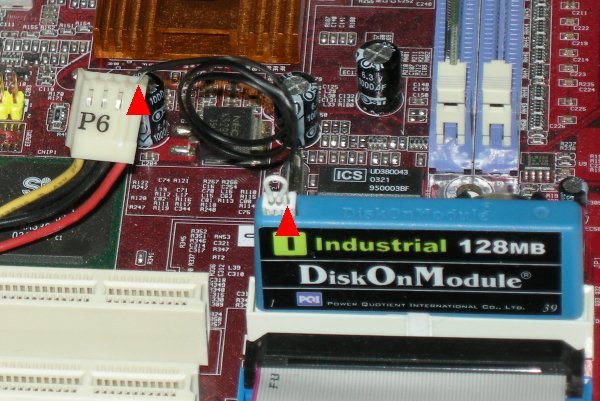
Powering the EON DOM For OS Installation
After the next boot, my DOM power connection proves to be sucsessfull so I am ready to install. The actual installation process is very straight-forward. At the NASLite-2 Initial boot screen, select option i for Installation Utility to launch the installer. From there follow the usual process and install NASLite-2 on the DOM.
NASLite-2 Initial Boot Screen
With the installation process complete, I eject the boot CD-ROM and power down the spare PC. I now have a bootable 128M DOM containing the OS of my DAS-to-NAS server.
- Step 3 - Initial NASLite-2 Boot
-
Moving on to the next step, I disconnect the DOM from the spare PC and place it back into the EONs IDE slot. With a monitor and keyboard attached, I make sure everything looks good, hold my breath and power on the EON. A few seconds later I was greeted by the NASLite-2 login prompt.
Most of you would be familiar with how to proceed with the basic configuration. If not, the NASLite-2 manual is a good place to start. In short however, now is the time to login, enter the license, and configure the network. I do all that, save and reboot. While rebooting, I used a Cat-5 patch cable an plugged the EON into my Switch so I can take a look at the NASLite-2 status screens.
What do you know, 192.168.2.150 is now alive and accessible via HTTP. The syslog looks good and I see no issues that need addressing. One thing that stands out at first glance is the 600 BogoMIPS. The EONs 300MHz Geode CPU is a slow processor.
Before I move on to the next step and since I´ve already accessed the EON from a client computer, I go ahead and unlock. If you are not sure how to do that, the NASLite-2 manual is a good resource. Ready for the next step, I power down and disconnect the monitor, keyboard and network cables from the EON.
- Step 4 - Adding Some Parts
-
As I mentioned earlier, this particular model has only 2 USB 1.1 ports. I am going to add an USB 2.0 card for a total of 6 ports, but you may choose to go a different route and install a FireWire or eSATA card in the EONs single PCI slot. That decision is strictly based on what DAS devices or external drives you intend to use.
A interesting alternative is a USB/FireWire combination card. I certainly would like to try one of those in my DAS-to-NAS device, but unfortunately, my pile of spares did not contain one.
Another item that needs consideration is the EONs 128M of RAM. Although that is enough to run NASLite-2 with smaller drives, it will not be sufficient to properly complete a filesystem check and repair on larger drives. I´d recommend adding a low profile 128M or 256M PC133 DIMM in the extra DIMM slot. A low profile DIMM is required in order to clear the add-on card.
Anyways, the 4-port USB 2.0 card and some extra RAM go in and I´m ready to test the DAS-to-NAS by attaching some external USB drives.
- Step 5 - Attaching and Formatting DAS
-
NASLite-2 does not support hot-plugging, so all drives must be plugged in and powered before we turn on the EON. Flash memory drives and most 2.5" enclosures containing notebook-sized drives are powered via the USB cable and do not require external power. Enclosures housing 3.5" drives however must be independently powered. I attach 3 devices - a USB Flash drive, an external 2.5" enclosure and an external 3.5" enclosure. Then, I power everything on in sequence, drives first, EON last.
The boot process took a few seconds, after which I heard the three beeps NASLite-2 issues when ready for use. Back to the client computer, I Telnet into the Admin Menu and take a moment to format the attached drives. Keep in mind that formatting erases existing data, so please be careful and don´t set yourself back by formatting a drive loaded with data.
With the drives formatted and set to mount as RW, I reboot NASLite-2 and wait patiently for the 3 beeps. Sure enough, a few seconds into the process I´m rewarded. The DAS-to-NAS is now ready for use. It can be used much in the same way one would use a conventional NASLite-2 setup. The only difference really is that the physical server itself does not contain any storage drives.
- Pros and Cons
-
You may be asking yourself that aside from the purely-illustrative purpose of this article, why would it make sense to build such a device, as opposed to a server housing storage drives in a conventional configuration? Here are a few of the benefits that such a setup can provide.
- The EON has no moving parts, generates little heat and consumes little power - as low as 5W when idle and no noise.
- Most external drives are designed to spin down autonomously, so without much effort, you can have dormant drives when not in use.
- Easy to add or remove drives.
- Modular and compact.
- Reuse all of your external enclosures or export the drives in your multi-drive DAS out to your LAN clients.
There are also some inherent cons or gotchas in this configuration. The ones I can think of offhand are as follows:
- The EON does not support ATX (Advanced Technology Extended) power, so powering it down using the power button alone is not recommended. Use the Admin Menu to shut down the services and unmount the drives before cutting the power. Other thin clients however may not have that problem.
- External drives are usually not the most reliable storage medium due to relatively poor quality of many external enclosures and the cabling used. To minimize the potential for problems, use the shortest cables possible. I´d recommend staying within a 3-foot maximum length.
- Using multiple external drives of the same type simultaneously, USB and FireWire in particular, can degrade performance significantly. That is due to the serial nature of those interfaces, so treat them accordingly.
![]()
![]()
![]()