
This article provides step-by-step instructions on how to share multiple NASLite servers as one.
NASLite-2 and NASLite-M2 are unique in many ways, but the one feature that is virtually unexploited is their ability to export remotely hosted volumes as if they were local. That can be valuable in a number of ways as we´ll try to demonstrate in the following paragraphs.
In short, this technique will allow you to share a bank of servers as one. It will also allow you to add and remove servers from the bank easily and inexpensively.
For starters we´ll need at least one primary (master) server and one or more secondary (slave) servers. The primary server must run NASLite-2 or NASLite-M2 while the only requirement for our secondary servers is that the hosted volumes are NFS exported. For that purpose, the secondary servers can run NASLIte-2, NASLite-M2, NASLite+, NASLite-NFS, NASLite-NFSG or any other UNIX/Linux OS.
If you do not have a second NASLite server but would like to follow this tutorial, you can use NASLite-NFS since it´s FREE and has the lowest hardware requirements. NASLite-NFS boots off of a floppy disk and runs in RAM. It and its associated documentation can be acquired from the Downloads page.
Let´s begin by setting up a secondary server. If you have an existing NASLite server, all that you have to do to prepare it for the purpose is to enable the NFS services. To do that, login as admin and using the Service Configuration Menu, set NFS (Option 6) to RW (Read/Write).
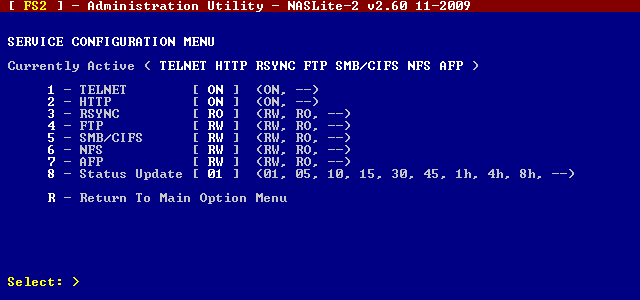
NASLite-2 Administration Utility - Service Configuration Menu
Making sure the secondary server is properly set for participation on our LAN, we double-check all network configuration parameters using the Network Configuration Menu. Keep a mental note of the secondary servers IP address, in this case, 192.168.2.251, as shown below. It will be required in the next step.
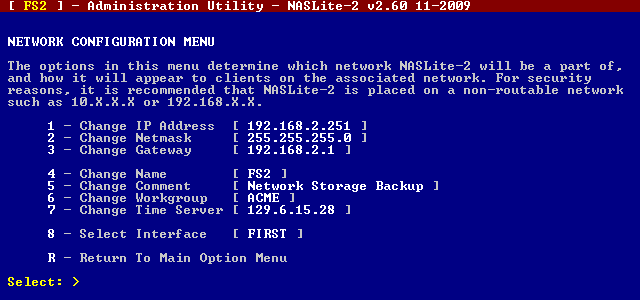
NASLite-2 Administration Utility - Network Configuration Menu
If you do not have a second NASLite server available, then you´ll have to make one, so take a look at the free NASLite-NFS or NASLite-NFSG. An alternative to building a physical server is to use a hypervizor such as VMware and install NASLite on a test VM.
At any rate, assuming we have one or more servers exporting volumes via NFS, we can now proceed to the next step.
Next we set the primary server. Basically, all we have to do is tell the primary server which IP addresses to scan for NFS exports and process them accordingly.
To enable the feature we Telnet into the primary server and login as admin. From the Main Options Menu, we select Storage Configuration (Option 3) followed by General Storage Option Menu (Option G). From the General Storage Option Menu we select Set Remote Storage Hosts (Option 4).
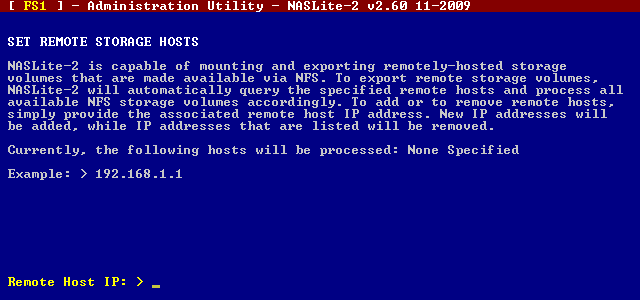
NASLite-2 Administration Utility - Set Remote Storage Hosts
Once at the Set Remote Storage Hosts screen, we can add the IP address of our secondary server by typing its IP address at the Remote Host IP: > prompt followed by the Enter key. Prior to proceeding, take a moment and read the directions on the screen.
Our remote host IP is 192.168.2.251 as seen in the previous step. After entering the secondary server IP address, we´ll be placed back to the General Storage Option Menu. From here you can add or remove remote storage (secondary) servers by using Set Remote Storage Hosts (Option 4) as many times as necessary.
When finished, move back out to the Main Options Menu and select Save Configuration (Option 9).
The last thing we have to do is reboot the primary server, but before we do that, we should make sure that the secondary servers are on and available on the network. Verifying everything is fine, we can Reboot (Option 7).
After rebooting the primary server, all secondary server NFS storage volumes will be made available via the primary server thus aggregating all associated volumes into a single access point.
Taking a look at the Server Storage status page we notice that in addition to the local Disk-0 and Disk-1 volumes, the primary server also lists the volumes made available by our secondary server at 192.168.2.251.
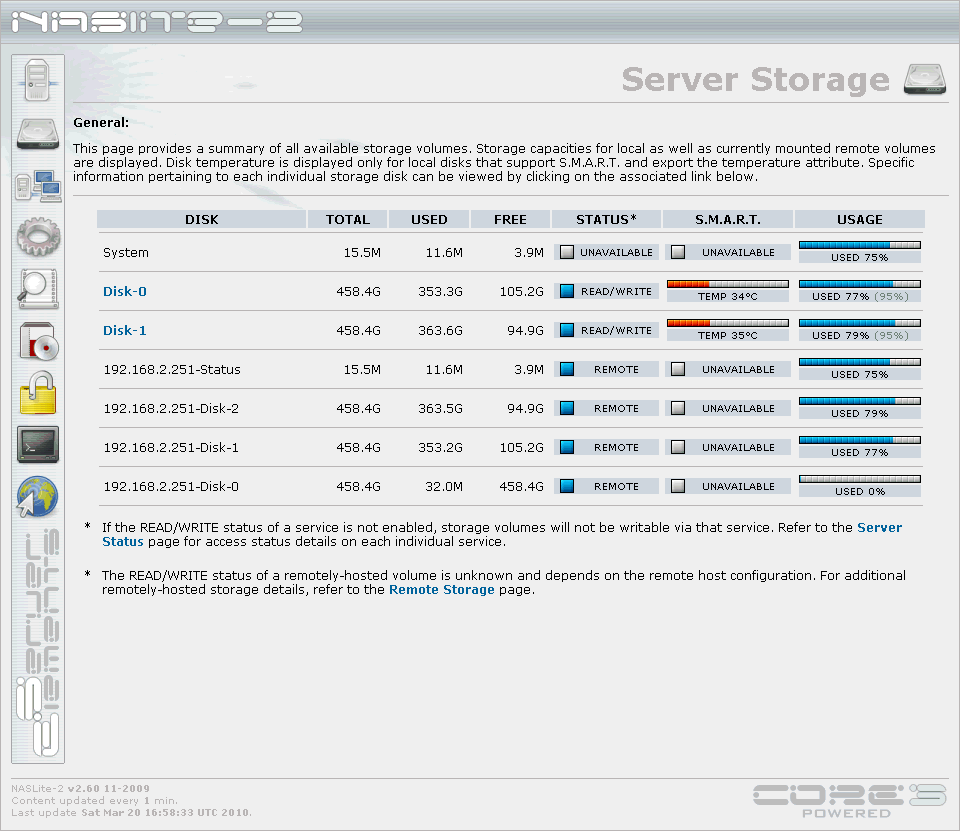
Typical Server Storage Status Page
The remote storage initialization process is outlined on the Remotely-Hosted Storage status page accessible via the Remote Storage link on the Server Storage status page. That information can provide some insight in the unlikely event of problems when troubleshooting may be necessary. A typical Remotely-Hosted Storage status page is shown below.
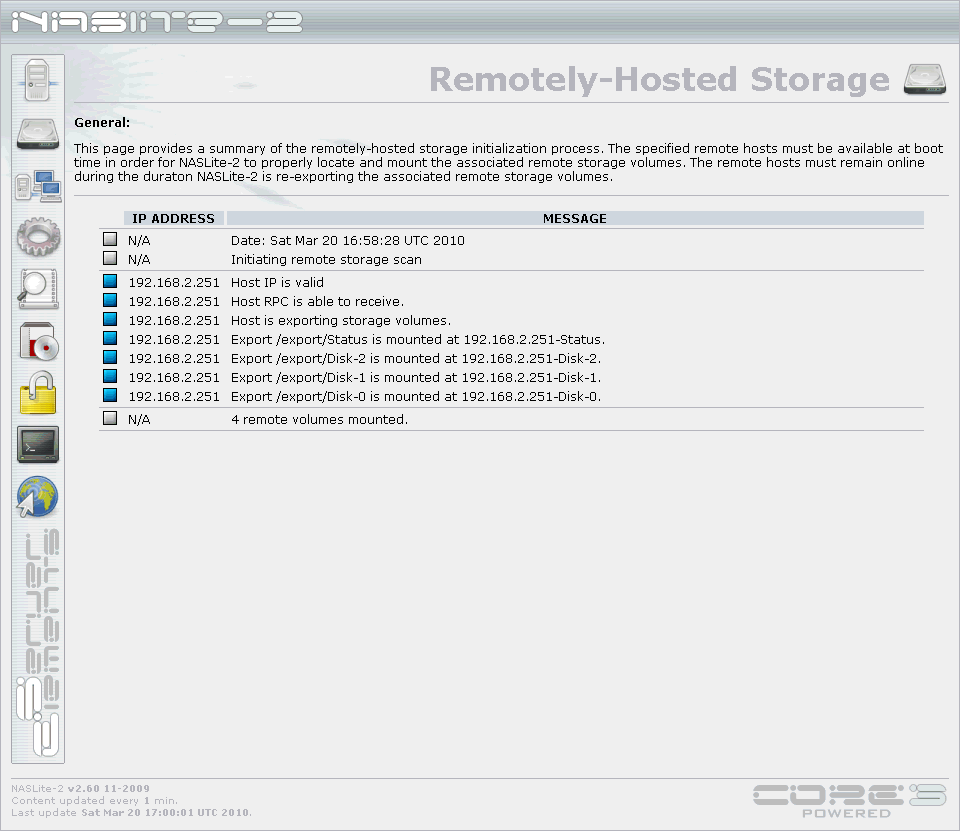
Typical Remotely-Hosted Storage Status Page
We are done. We can now access the storage volumes on one or more secondary servers via the primary server.
This technique offers some benefits that may be very handy in some situations. A few are as follows:
There are also some drawbacks, most notably performance. The data has to go to the primary and then to the secondary via the same network cabling. That of course will essentially halve the throughput as compared the locally hosted volumes.
Title: Sharing Multiple NASLite Servers as One
URL: http://www.serverelements.com/?target=Sharing_Multiple_NASLite_Servers_as_One
Printed: Friday May 29th, 2026
Copyright © 2026 Server Elements
All Rights Reserved