
Keeping your data safe is easy with NASLite-2 and NASLite-M2 due to an unique NASLite Disk Mirroring feature. Something in between RAID-1 and a daily backup, NASLite Disk Mirroring is a practical hybrid solution that can be used to effectively prevent data loss due to hardware failure or user mistakes.
Disk mirroring is usually associated with a RAID-1 setup where two disks are simultaneously updated with the same data for the purpose of redundancy. In the case of NASLite however, disk mirroring is significantly different.
This guide illustrates the benefits and potential drawbacks of NASLite Disk Mirroring as well as various setup approaches and configurations.
We often hear that RAID is no substitute for a good backup. That is very true. I can't tell you how many times I've deleted files only to realize what I've done a few seconds later. The point here is that sometime we all delete and overwrite files without meaning to do so. RAID will be of no help here.
Enter NASLite Disk Mirroring. It occurs once each 24 hours and creates a copy of a source disk to a destination (mirror) disk. The source and destination disks can be physically installed in the same server, or on different servers connected via Ethernet. The actual mirroring of the data is performed by updating the destination disk to match the contents of the source disk using rsync. That's all there is to it.
How is it better than RAID? Consider the following NASLite Disk Mirroring benefits:
To summarize, NASLite Disk Mirroring will keep your data safe more effectively than RAID without the overhead or expense or RAID. It will also provide a daily backup you can use to immediately recover deleted or overwritten files.
The actual mirroring only reads data from the source disk. The source disk is never modified while mirroring and is therefore well protected.
Disk mirroring is supported on all current NASLite-2 and NASLite-M2 operating systems. For simplicity, in this guide we'll refer to NASLite-2 and NASLite-M2 as NASLite.
To enable disk mirroring on a NASLite server, a source and destination disks are required. The destination disk will be overwritten with data from the source disk, so proper precautions must be taken not to overwrite anything you intend to keep. Since the mirror is performed on the filesystem level, the disks do not necessarily have to be the same size. The most important consideration is that the destination disk is able to accommodate the data held by the source disk.
Setting up a local disk mirror requires that both source and destination disks are physically installed in the same server. For illustration purposes let's assume the following:
Begin the setup process by logging in as admin, then follow the steps below:
Step 1
From the Main Options Menu, select Storage Configuration Menu (Option-3).
Step 2
At the Storage Configuration Menu, select your destination (mirror) drive. In this scenario that is Disk-1 (Option-1). You will now be placed in the Disk-1 Configuration Menu.
Step 3
Select Mirror to Disk-1 (Option-9) to enter the Mirror to Disk-1 configuration screen.
Step 4
The directions on how to set the mirror are right on the Mirror to Disk-1 configuration screen. The three parameters are Remote Server IP, Source Disk, and Mirror Time. The parameters for this scenario therefore are as simple as /Disk-0/, leaving the first and last parameters blank.
Configure the mirror by typing /Disk-0/ at the Mirror to Disk-1 prompt, hit the Enter key. The Mirror Parameters screen will be displayed. Verify that avarything is correct and if satisfied, type "Y" and hit the Enter key once again. You are done.
Now at 00 UTC each day, the contents of Disk-0 will be copied to Disk-1
Some of the screens you'll encounter during the above setup are shown below:
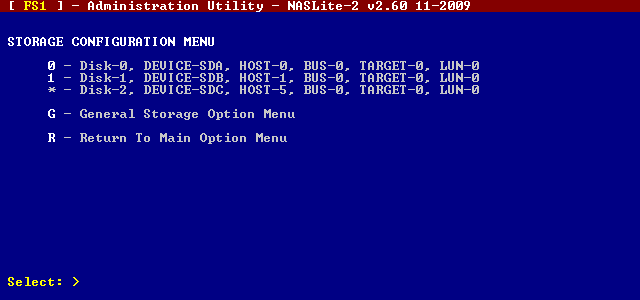
NASLite-2 Administration Utility - Storage Configuration Menu
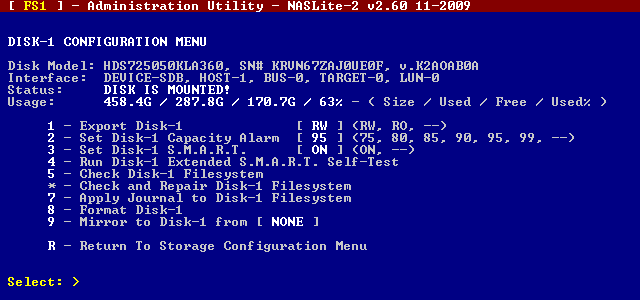
NASLite-2 Administration Utility - Disk-1 Configuration Menu
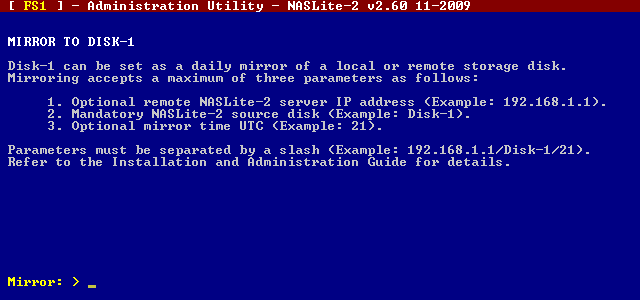
NASLite-2 Administration Utility - Mirror to Disk-1
.gif)
NASLite-2 Administration Utility - Mirror Parameters (Local Mirror)
Setting up a remote disk mirror requires that the source and destination disks are physically installed in different NASLite servers. For illustration purposes let's assume the following:
Begin the setup process by logging in the destination NASLite server as admin, then follow the steps below:
Step 1
From the Main Options Menu, select Storage Configuration Menu (Option-3).
Step 2
At the Storage Configuration Menu, select your destination (mirror) drive. In this scenario that is Disk-1 (Option-1). You will now be placed in the Disk-1 Configuration Menu of the destination NASLite server.
Step 3
Select Mirror to Disk-1 (Option-9) to enter the Mirror to Disk-1 configuration screen. You will now be placed in the destination NASLite server Mirror to Disk-1 configuration screen.
Step 4
The directions on how to set the mirror are right on the Mirror to Disk-1 configuration screen. The three parameters are Remote Server IP, Source Disk, and Mirror Time. The parameters for this scenario therefore are 192.168.2.100/Disk-0/, leaving the last parameters blank.
Configure the mirror by typing 192.168.2.100/Disk-0/ at the destination NASLite server Mirror to Disk-1 prompt then hit the Enter key. The Mirror Parameters screen will be displayed. Verify that everything is correct and if satisfied, type "Y" and hit the Enter key once again. You are done.
Now at 00 UTC each day, the contents of Disk-0 at the source NASLite server will be copied to Disk-1 at the destination NASLite server.
Some of the screens you'll encounter during the above setup are shown below:
NASLite-2 Administration Utility - Storage Configuration Menu
NASLite-2 Administration Utility - Disk-1 Configuration Menu
NASLite-2 Administration Utility - Mirror to Disk-1
.gif)
NASLite-2 Administration Utility - Mirror Parameters (Remote Mirror)
The status of a disk mirror can be monitored using the NASLite Status screens. Specifically, the Server Storage Disk-X status screen where Disk-X is the destination (mirror) disk. A typical example status screen with mirror details as well as a typical Mirror Log are shown below.
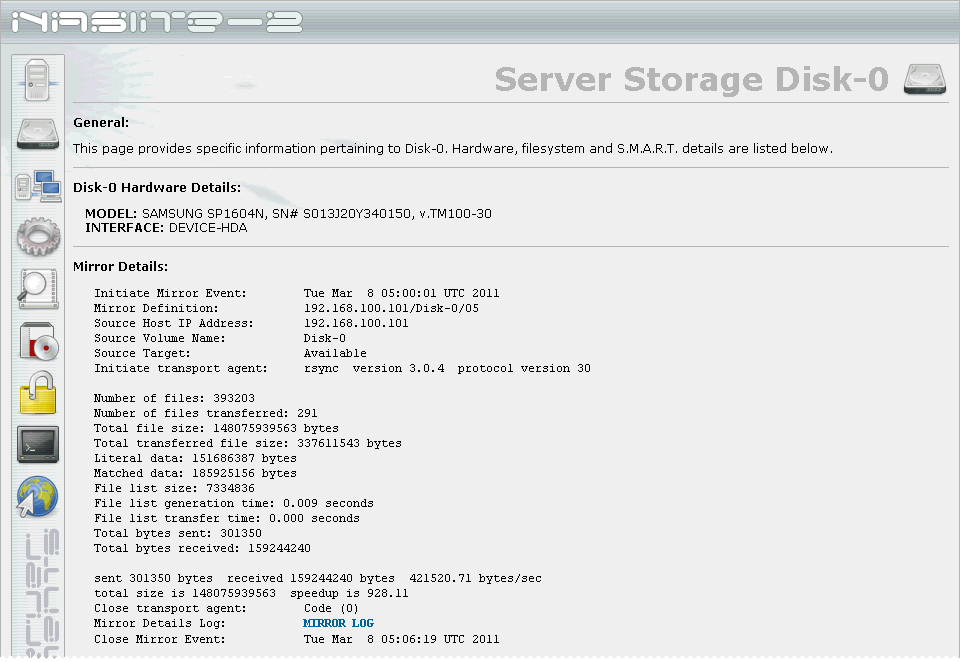
NASLite-2 Status Information - Server Storage Disk Mirror Details
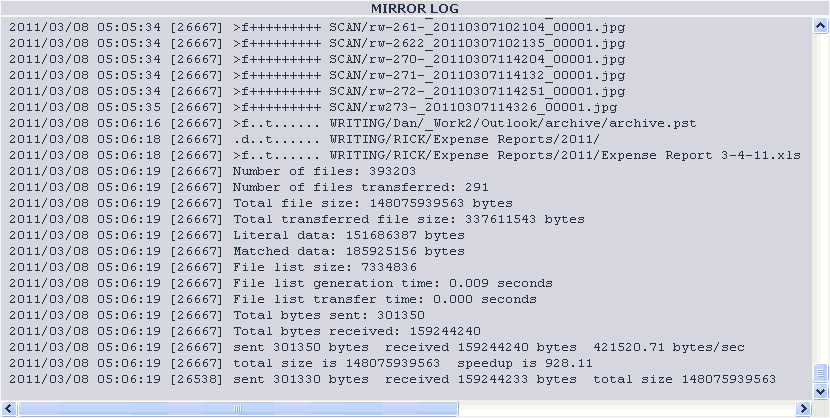
NASLite-2 Status Information - Server Storage Disk Mirror Log
As with everything, there are pros and cons to this type of disk mirroring. The most significant benefits of NASLite Disk Mirroring are outlined in the "Is NASLite Disk Mirroring Better Than RAID?" section above. The drawbacks on the other hand are only significant in the event a of source disk failure and are as follows:
In the context of a NAS, however, new file creation activity is often not very high, so the possibility of significant data loss due to source disk failure is minimal. I have used NASLite Disk Mirroring as my primary data protection strategy for well over 6 years with great success. It is a superior, economical and effective substitute for the overhyped software RAID used in most hardware NAS devices.
Title: Introduction to NASLite Disk Mirroring
URL: http://www.serverelements.com/?target=Introduction_to_NASLite_Disk_Mirroring
Printed: Tuesday March 24th, 2026
Copyright © 2026 Server Elements
All Rights Reserved